Solids Editing..Taper Faces
![]() Taper Faces at a specified angle, from the
first pick point to the second.
Taper Faces at a specified angle, from the
first pick point to the second.
Tapering the selected face with a positive angle tapers the face inward,
and a negative angle tapers the face outward.
Taper a cylinder to make it a cone
Click on the SW Isometric view from the View Toolbar
Create a CYLINDER of R 0.75 and height 8 units in 2D Wireframe
as shown in Figure 1.
Invoke a CYLINDER (Draw menu > Solids > Cylinder)
Command: cylinder
Current wire frame density: ISOLINES=16
Specify center point for base of cylinder or [Elliptical] <0,0,0>:
Pick a point
Specify radius for base of cylinder or [Diameter]: .75(Radius)
Specify height of cylinder or [Center of other end]:8
Alter the shade mode to GOURAUD SHADED from the Shade Toolbar as shown in Figure 2
 Figure 1 |
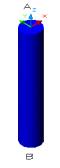 Figure 2 |
TAPER the cylinder using TAPER FACE command at point
A as the base point and taper angle of -25 (-ve) as shown in Figure
3
Invoke Taper Faces (Modify menu > Solids Editing > Taper Faces)
Command: _solidedit
Solids editing automatic checking: SOLIDCHECK=1
Enter a solids editing option [Face/Edge/Body/Undo/eXit] <eXit>:
_face
Enter a face editing option
[Extrude/Move/Rotate/Offset/Taper/Delete/Copy/coLor/Undo/eXit] <eXit>:
_taper
Select faces or [Undo/Remove]: Select the cylinder
Select faces or [Undo/Remove/ALL]: Enter
Specify the base point: SNAP to CENTER at point A
Specify another point along the axis of tapering: SNAP to CENTER at
point B
Specify the taper angle: -25 (negative -25)
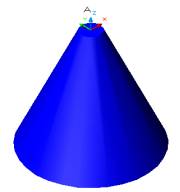
Figure 3
UNDO the taper command till you get the cylinder
TAPER the cylinder using TAPER FACE command at point
B as the base point and taper angle of -25 (-ve) as shown in Figure
4
Invoke Taper Faces (Modify menu > Solids Editing > Taper Faces)
Command: _solidedit
Solids editing automatic checking: SOLIDCHECK=1
Enter a solids editing option [Face/Edge/Body/Undo/eXit] <eXit>:
_face
Enter a face editing option
[Extrude/Move/Rotate/Offset/Taper/Delete/Copy/coLor/Undo/eXit] <eXit>:
_taper
Select faces or [Undo/Remove]: Select the cylinder
Select faces or [Undo/Remove/ALL]: Enter
Specify the base point: SNAP to CENTER at point B
Specify another point along the axis of tapering: SNAP to CENTER at
point A
Specify the taper angle: -25 (negative -25)
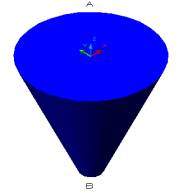
Figure 4
TAPER the top face of the cone by using TAPER FACE command,
by selecting point C and taper angle of 15 °as shown in Figure 5 and
6
Invoke Taper Faces (Modify menu > Solids Editing > Taper Faces)
Command: _solidedit
Solids editing automatic checking: SOLIDCHECK=1
Enter a solids editing option [Face/Edge/Body/Undo/eXit] <eXit>:
_face
Enter a face editing option
[Extrude/Move/Rotate/Offset/Taper/Delete/Copy/coLor/Undo/eXit] <eXit>:
_taper
Select faces or [Undo/Remove]: Click on point A just to select the
top face of the cone
Select faces or [Undo/Remove/ALL]: Enter
Specify the base point: SNAP to CENTER at point A
Specify another point along the axis of tapering: SNAP to QUADRANT
at point C
Specify the taper angle: 15
 Figure 5 |
 Figure 6 |
TAPER the width of the cone by 10 unit using TAPER FACE
command, by selecting the front face of the cone ONLY as shown
in Figure 7
Invoke Taper Faces (Modify menu > Solids Editing > Taper Faces)
Command: _solidedit
Solids editing automatic checking: SOLIDCHECK=1
Enter a solids editing option [Face/Edge/Body/Undo/eXit] <eXit>:
_face
Enter a face editing option
[Extrude/Move/Rotate/Offset/Taper/Delete/Copy/coLor/Undo/eXit] <eXit>:
_taper
Select faces or [Undo/Remove]: Click on front face of the cone ONLY
Select faces or [Undo/Remove/ALL]: Enter
Specify the base point: SNAP to CENTER at point B
Specify another point along the axis of tapering: SNAP to CENTER at
point A
Specify the taper angle: 10
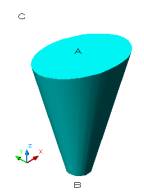
Figure 7
Taper the wedge using differenct faces and angles
Click on the SE Isometric view from the View Toolbar
Create a WEDGE as shown in Figure 8
Invoke a WEDGE (Draw menu > Solids > Wedge)
Command: _wedge
Specify first corner of wedge or [CEnter] <0,0,0>: Pick a point
Specify corner or [Cube/Length]: C (cube)
Specify length: 5
TAPER the angle of wedge by using TAPER FACE
command, from 45° to -15 °as shown in Figure 9
Invoke Taper Faces (Modify menu > Solids Editing > Taper Faces)
Command: _solidedit
Solids editing automatic checking: SOLIDCHECK=1
Enter a solids editing option [Face/Edge/Body/Undo/eXit] <eXit>:
_face
Enter a face editing option
[Extrude/Move/Rotate/Offset/Taper/Delete/Copy/coLor/Undo/eXit] <eXit>:
_taper
Select faces or [Undo/Remove]: Select the top face of the wedge ONLY
Select faces or [Undo/Remove/ALL]: Enter
Specify the base point: SNAP to ENDPOINT at point A
Specify another point along the axis of tapering: SNAP to ENDPOINT
at point B
Specify the taper angle: -15 (negative -15)
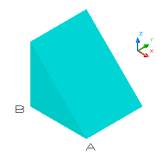 Figure 8 |
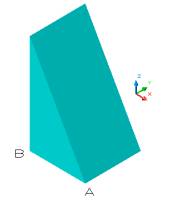 Figure 9 |
TAPER side face of the wedge using TAPER FACE command, at
selecting point C and A as shown in Figure 10 - 11
Invoke Taper Faces (Modify menu > Solids Editing > Taper Faces)
Command: _solidedit
Solids editing automatic checking: SOLIDCHECK=1
Enter a solids editing option [Face/Edge/Body/Undo/eXit] <eXit>:
_face
Enter a face editing option
[Extrude/Move/Rotate/Offset/Taper/Delete/Copy/coLor/Undo/eXit] <eXit>:
_taper
Select faces or [Undo/Remove]: Select the side face of the wedge
Select faces or [Undo/Remove/ALL]: Enter
Specify the base point: SNAP to ENDPOINT at point C
Specify another point along the axis of tapering: SNAP to ENDPOINT
at point A
Specify the taper angle: 20
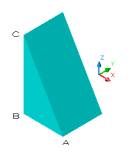 Figure 10 |
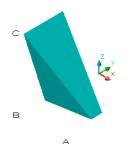 Figure 11 |
Taper the cube to form a wedge and a triangle
Click on the SW Isometric view from the View Toolbar
Create a CUBE as shown in Figure 12
Invoke BOX (Draw menu > Solids > Box).
Command: _box
Specify corner of box or [CEnter] <0,0,0>: Pick a point
Specify corner or [Cube/Length]: C (cube)
Specify length: 7
TAPER the box using TAPER FACE command, to create a wedge
as shown in Figure 13
Invoke Taper Faces (Modify menu > Solids Editing > Taper Faces)
Command: _solidedit
Solids editing automatic checking: SOLIDCHECK=1
Enter a solids editing option [Face/Edge/Body/Undo/eXit] <eXit>:
_face
Enter a face editing option
[Extrude/Move/Rotate/Offset/Taper/Delete/Copy/coLor/Undo/eXit] <eXit>:
_taper
Select faces or [Undo/Remove]: Select the top face of the cube
Select faces or [Undo/Remove/ALL]: Enter
Specify the base point: SNAP to ENDPOINT at point A
Specify another point along the axis of tapering: SNAP to ENDPOINT
at point B
Specify the taper angle: 45
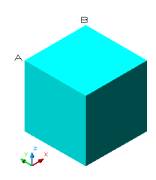 Figure 12 |
 Figure 13 |
TAPER the wedge using TAPER FACE command,
to create a triangle as shown in Figure 14 and 15
Invoke Taper Faces (Modify menu > Solids Editing > Taper Faces)
Command: _solidedit
Solids editing automatic checking: SOLIDCHECK=1
Enter a solids editing option [Face/Edge/Body/Undo/eXit] <eXit>:
_face
Enter a face editing option
[Extrude/Move/Rotate/Offset/Taper/Delete/Copy/coLor/Undo/eXit] <eXit>:
_taper
Select faces or [Undo/Remove]: Select the square face of the wedge
Select faces or [Undo/Remove/ALL]: Enter
Specify the base point: SNAP to ENDPOINT at point A
Specify another point along the axis of tapering: SNAP to ENDPOINT
at point B
Specify the taper angle: -45 (negative -45)
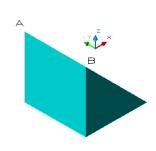 Figure 14 |
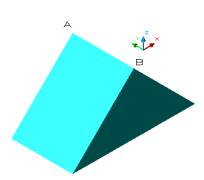 Figure 15 |